iOS7 interactive transitions
29 Sep 2013
iOS 7 introduces a new way to implement custom transitions between view controllers. This post and accompanying project shows how we can use custom transitions with a UINavigationController and how to make the pop transition interactive.
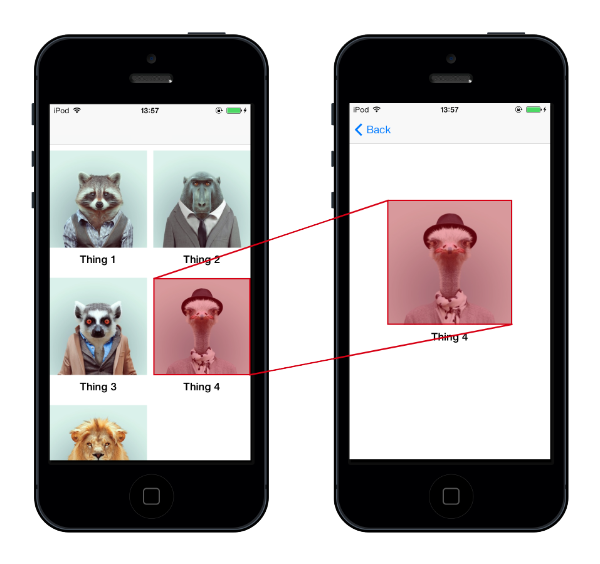
In this example we'll be adding a custom transition between two view controllers. DSLFirstViewController is a collection view displaying Things. Each cell has an image and a label. DSLSecondViewController shows a single thing and also has an image and a label. What we'd like to do during the transition is animate the cell's image view to second view controller's image view.
The Xcode project for this article is available on GitHub.
Implementing a custom transition
Transitions are handled by objects that conform to the UIViewControllerAnimatedTransitioning protocol. Let's start by defining an NSObject subclass called DSLTransitionFromFirstToSecond that conforms to this protocol that we can use to transition between the first and second view controllers
There are two methods we need to implement in our transition object, animateTransition: and transitionDuration:. The most straightforward is transitionDuration:, it simply specifies the duration of a transition.
- (NSTimeInterval)transitionDuration:(id<UIViewControllerContextTransitioning>)transitionContext {
    return 0.3;
}
The animateTransition: method is where the main business of transitioning between two views happens. It's passed an object that gives us access to a number of objects that we'll use in our transition.
viewControllerForKey:gives us access to the two view controllers we're transitioning betweencontainerViewproperty gives us the containing view of both view controllersinitialFrameForViewController:andfinalFrameForViewControllergive us the start and end position of each view controller's view
Let's look at our transition's animateTransition: implementation. The first thing we do is grab pointers to our view controllers and their containing view.
- (void)animateTransition:(id<UIViewControllerContextTransitioning>)transitionContext {
    DSLFirstViewController *fromViewController = (DSLFirstViewController*)[transitionContext viewControllerForKey:UITransitionContextFromViewControllerKey];
    DSLSecondViewController *toViewController = (DSLSecondViewController*)[transitionContext viewControllerForKey:UITransitionContextToViewControllerKey];

    UIView *containerView = [transitionContext containerView];
Next we get the cell we're transitioning from and make a snapshot of it's image view. It's this snapshot that we'll animate during our transition. We also hide the cell's image view to give the illusion that it's moving and rather than a snapshot of it moving.
    // Get a snapshot of the thing cell we're transitioning from
    DSLThingCell *cell = (DSLThingCell*)[fromViewController.collectionView cellForItemAtIndexPath:[[fromViewController.collectionView indexPathsForSelectedItems] firstObject]];
    UIView *cellImageSnapshot = [cell.imageView snapshotView];
    cellImageSnapshot.frame = [containerView convertRect:cell.imageView.frame fromView:cell.imageView.superview];
    cell.imageView.hidden = YES;
We then setup the second view controller's view, positioning it in it's final position but making it transparent. We'll fade it in over the duration of the transition
    // Setup the initial view states
    toViewController.view.frame = [transitionContext finalFrameForViewController:toViewController];
    toViewController.view.alpha = 0;
    toViewController.imageView.hidden = YES;

    [containerView addSubview:toViewController.view];
    [containerView addSubview:cellImageSnapshot];
We're now ready to animate the views, moving the image snapshot and fading in the second view controller's view. In the completion block of the animation, we remove our temporary snapshot view and restore the visibility of the views we hid.
    [UIView animateWithDuration:duration animations:^{
        // Fade in the second view controller's view
        toViewController.view.alpha = 1.0;

        // Move the cell snapshot so it's over the second view controller's image view
        CGRect frame = [containerView convertRect:toViewController.imageView.frame fromView:toViewController.view];
        cellImageSnapshot.frame = frame;
    } completion:^(BOOL finished) {
        // Clean up
        toViewController.imageView.hidden = NO;
        cell.hidden = NO;
        [cellImageSnapshot removeFromSuperview];

        // Declare that we've finished
        [transitionContext completeTransition:!transitionContext.transitionWasCancelled];
    }];
}
In the completion block we have to make sure we inform the transition context that our transition is complete by calling completeTransition:
Using the custom transition
So far we've defined a custom transition object, but we've not told the UINavigationController to use it. Let's look at how we do this.
When a new view controller is pushed onto or popped off it's navigation stack, it will ask it's delegate for an object that conforms to the UIViewControllerAnimatedTransitioning protocol. It's here that we need to provide an instance of out custom transitioning object.
The first thing to do is to specify that our view controller conforms to the UINavigationControllerDelegate protocol
@interface DSLFirstViewController ()<UINavigationControllerDelegate>
We also need to make our view controller it's navigation controller's delegate. A good spot to do this is in viewDidAppear:.
- (void)viewDidAppear:(BOOL)animated {
    [super viewDidAppear:animated];

    // Set outself as the navigation controller's delegate so we're asked for a transitioning object
    self.navigationController.delegate = self;
}
We should also stop being the navigation control's delegate when the view controller is disappearing
- (void)viewWillDisappear:(BOOL)animated {
    [super viewWillDisappear:animated];

    // Stop being the navigation controller's delegate
    if (self.navigationController.delegate == self) {
        self.navigationController.delegate = nil;
    }
}
Now our view controller is the navigation controller's delegate, we can implement the following longwinded UINavigationControllerDelegate method
- (id<UIViewControllerAnimatedTransitioning>)navigationController:(UINavigationController *)navigationController
                                  animationControllerForOperation:(UINavigationControllerOperation)operation
                                               fromViewController:(UIViewController *)fromVC
                                                 toViewController:(UIViewController *)toVC {
    // Check if we're transitioning from this view controller to a DSLSecondViewController
    if (fromVC == self && [toVC isKindOfClass:[DSLSecondViewController class]]) {
        return [[DSLTransitionFromFirstToSecond alloc] init];
    }
    else {
        return nil;
    }
}
And that's it. When the second view controller is pushed onto the navigation controller's stack, the navigation controller will use our custom transition.
To transition back from the second view controller to the first, we go through the same exercise, implementing a new class DSLTransitionFromSecondToFirst
Making transitions interactive
No we have our custom transition, it's time to make it interactive by dragging from the left edge of the screen. To do this we take advantage of a new type of gesture recogniser introduced in iOS 7, UIScreenEdgePanGestureRecognizer.
We'll create a UIScreenEdgePanGestureRecognizer in our second view controller's implementation of viewDidLoad.
- (void)viewDidLoad {
    [super viewDidLoad];

    ...

    UIScreenEdgePanGestureRecognizer *popRecognizer = [[UIScreenEdgePanGestureRecognizer alloc] initWithTarget:self action:@selector(handlePopRecognizer:)];
    popRecognizer.edges = UIRectEdgeLeft;
    [self.view addGestureRecognizer:popRecognizer];
}
Now we can recognise the gesture, we use this to setup and update an instance of another new class introduced in iOS 7, UIPercentDrivenInteractiveTransition. This will take care of managing how far through our transition's animation we are based on updates from our gesture recogniser. We do this in our gesture recogniser's action handler.
When the gesture recogniser has begun, we create and store an instance of UIPercentDrivenInteractiveTransition and ask the navigation controller to pop ourself off it's view controller stack.
As the gesture recogniser changes, we update the UIPercentDrivenInteractiveTransition with the amount of progress the user has made with the gesture
When the gesture recogniser ends, we work out if the user has dragged far enough for the transition to complete or whether the transition should be cancelled. We then call finishInteractiveTransition or cancelInteractiveTransition as appropriate.
- (void)handlePopRecognizer:(UIScreenEdgePanGestureRecognizer*)recognizer {
    // Calculate how far the user has dragged across the view
    CGFloat progress = [recognizer translationInView:self.view].x / (self.view.bounds.size.width * 1.0);
    progress = MIN(1.0, MAX(0.0, progress));

    if (recognizer.state == UIGestureRecognizerStateBegan) {
        // Create a interactive transition and pop the view controller
        self.interactivePopTransition = [[UIPercentDrivenInteractiveTransition alloc] init];
        [self.navigationController popViewControllerAnimated:YES];
    }
    else if (recognizer.state == UIGestureRecognizerStateChanged) {
        // Update the interactive transition's progress
        [self.interactivePopTransition updateInteractiveTransition:progress];
    }
    else if (recognizer.state == UIGestureRecognizerStateEnded || recognizer.state == UIGestureRecognizerStateCancelled) {
        // Finish or cancel the interactive transition
        if (progress > 0.5) {
            [self.interactivePopTransition finishInteractiveTransition];
        }
        else {
            [self.interactivePopTransition cancelInteractiveTransition];
        }

        self.interactivePopTransition = nil;
    }
}
Now we're creating and updating a UIPercentDrivenInteractiveTransition object, we need to tell the navigation controller to use it. We do this by implementing another new UINavigationControllerDelegate method:
- (id<UIViewControllerInteractiveTransitioning>)navigationController:(UINavigationController *)navigationController
                         interactionControllerForAnimationController:(id<UIViewControllerAnimatedTransitioning>)animationController {
    // Check if this is for our custom transition
    if ([animationController isKindOfClass:[DSLTransitionFromSecondToFirst class]]) {
        return self.interactivePopTransition;
    }
    else {
        return nil;
    }
}
Our custom transition from the second view controller back to the first is now interactive.
Summary
Hopefully this post and the example project will help you to understand the steps needed to create your own custom transitions and interactions. A sample Xcode project is available on GitHub.